Workshop

Workshop

Monday, December 7, 2009

Last minute Christmas ideas?


If you're in need of some last minute inspiration come along to the 'Clovelly Mum's Craft Show Case' next Monday on Arden Street and you might just find what you need! I'll be there selling my Craft Kit Bags, bedroom door plaques, reindeer food (great fun for the children to sprinkle for the reindeer on Christmas eve) and more goodies. Plus there will be a selection of other hand made crafts made by local Clovelly Mums. Everyone is welcome to come and have a look, pass it on!
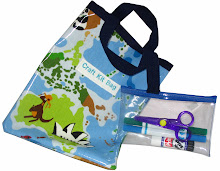
Date: Monday 14th dec
Where:The Garage 86 Arden st Time: 9.30 to 1.00pm

Sunday, December 6, 2009

Bronte Sewing Room


Over the past year I've been going to an inspiring sewing course run by Colette Reynolds at Sprouts and I've learnt to make even more wonderful things! Although I've been sewing for years now, I'm self taught and have always used my own designs and had my own little 'way' of doing things. This has been the ideal opportunity to learn how to sew using patterns and professional techniques with the support of Colette in her gorgeous shop. I've met a lovely group of people from beginners through to more experienced sewers and we've all shared stories, laughs and cups of tea (with biscuits, of course!) whilst sewing our individual creations. It's been the high point of my week! My last project was three fun wrap skirts for my daughter that I will give her at Christmas and I'm thrilled with the results. The course has been so successful that next year Colette has decided to dedicate space in her shop and call it the 'Bronte Sewing Room' (yay!)

Wednesday, December 2, 2009

My next market date this Sunday...


I'm at the Shore Break Market this Sunday (13th).
The Beach Palace Hotel
196 Dolphin Street, Coogee. Between 11-4pm

There's usually a mix of stall holders selling things like clothes (children & adults), bags, jewellery, children's crocheted toys and hair accessories. I'll be selling my 'Craft Kit Bags', upholstered bedroom door plaques and upholstered notice boards amongst other goodies. If you're short of Christmas present ideas it's worth a look.

Tuesday, December 1, 2009

Baby 'Etsy' has arrived!


It's been a long time coming and finally it's here...I would like to announce the 'grand' opening of my Etsy shop! O.K. maybe it's not quite as grand as I'd like it to be, I've currently got three items listed, but I'll be adding more as the weeks go by (I promise!). If you want to have a look either follow the link above or click on the orange icon to the right of the page, all feedback is very welcome. I can honestly say it's been a joint effort with the support of my wonderful friends along the way. The plan is to build it up over the next 12 months and have a much bigger selection of goodies to choose from. In the meantime I'm getting used to the idea of photographing everything I make, my front room has never looked so professional...

Monday, November 30, 2009

To market, to market...


Although I regularly sold my things at craft markets in the UK, last Sunday at the Coogee Palace was my first Sydney market. It was a surreal experience, I stood at my table gazing at panoramic views of Coogee Beach and the shimmering sea whilst people bustled by with sandy feet. This was all in stark contrast to the rolling green country side and crisp cold winds of a British craft fair! Thank you to all those who came to visit and give a friendly smile, I needed it! The sun was shining and I was wilting, but I'm still really pleased I've taken the plunge. I'll definitely be selling my things at markets next year and will post dates in advance.

Thursday, November 19, 2009

The Adventures of Wonk


This is officially my all time favourite Children's book. Wonk is a wonderful lovable Koala bear who lives with his owner Peter and the two of them are constantly getting themselves into trouble (of a very gentle kind!). The stories are beautifully written. There's something very special about the illustrations too and I can't quite decide why. They seem to evoke deep feelings of nostalgia somehow. It wasn't until recently I realised how odd it was that I should love the book so much as a child and then come to live in Australia for my own adventure...hmm, I sense a koala theme!

Wednesday, November 18, 2009

Corn Flake Packet Chair!


I made this chair from a cornflake packet, a shoulder pad (for the seat) and two of my husband's Bic razors! (much to his annoyance)

Some years ago I went back to college to study upholstery and my tutor asked me to present my design project in an 'interesting' way. I love a creative challenge and tackle them with military style determination. So, armed with a cornflakes packet a pair of scissors and a reel of Sellotape I was off.....one hour later I had the completed chair structure, but the beautifully carved and curved chair legs at the front of the model presented a real challenge. Whilst lying in the bath pondering over my options I caught sight of my husband's Bic razor and genius struck! I snapped the razor head off, moulded air drying clay around the handle and then painted it with brown acrylic paint. It looked perfect. Next challenge was the soft padded and upholstered seat, and again it occurred to me that the ideal shape would be a large 'Crystal Carrington' style shoulder pad covered in attractive fabric, trimmed with real upholstery gimp. Finally the design brief was all neatly written out on card, complete with illustrations and concealed neatly under the seat pad.

"Operation Chair. Mission complete. Over and out"

Saturday, November 7, 2009

Gifts from the heart...


Over the years I've been the lucky recipient of some wonderful gifts from family and friends. Without doubt the most memorable and cherished have always been those that have been handmade, two of which are particularly special. One is an old wooden tea tray covered in magazine cutout images of cakes and deserts, in an alternative 'decoupage' style. It's unusual and curiously pleasing too.

The other is a hand painted and glazed tile depicting a couple gazing at each other whilst sipping wine. The tile is framed on a chunky square of 'found', solid wood that was then carved into the desired shape. Upon receiving these gifts I felt quite emotional and thankful for such kind thoughtful friends.

Thursday, November 5, 2009

Japanese Tea Party


Towards the end of last year my last commission in the UK (before the big move to Australia) was for a Japanese client. She wanted a fully upholstered doll's house for her daughter to take back to Japan and asked if I could embroider the family name on the front so that they could keep it as an heirloom for generations to come. This was a very special project for me as we were also good friends and would soon be parting ways. We spent many coffee mornings together choosing fabrics whilst our children played and we discussed the design. At the end of the project she very kindly asked me over to a friend's house to share a real Japanese tea morning. I was enchanted by the careful presentation of the food and table. We had a delicious green tea cake with sweet aduki bean sauce and cream, it has a very delicate almost fragrant flavour with a light consistency similar to a souffle. I felt a little bashful at the thought of my very English tea and biscuits I had served at my house, and on one occasion I had baked a tray of flapjacks that had ended up as a heap of crumbs much to everyone's amusement!

What to do with all those crafty 'things'?


Dedicate one cupboard in the house, preferably near a table and call it the 'craft cupboard'. Make it easily accessible for the children so they can help themselves. Keep sharp things and paint out of reach in a separate place. Fill the cupboard with age appropriate stimulating crafty things. Colouring books, a ready supply of blank paper, sparkly shapes, stickers, glue stick, plastic boxes or shoe boxes full of old birthday cards, images cut out of magazines and colouring pens. Use interesting plastic jars for beads and ribbon. We store sewing, knitting and weaving kits in the craft cupboard too. Get them involved in packing things away into the craft cupboard after the activity (good luck with this one!) Periodically have a craft cupboard clear out and reorganise so things are easy to access. Try and keep seasonal items like Christmas glitter or Halloween stickers in a separate location and pop them in the cupboard as a surprise for the children to find.

I always smile when I see them excitedly delving in and helping themselves to the craft goodies. It's nice to know they have some creative freedom plus they can independently set themselves up with an activity without having to nag at me to provide the in-house entertainment!

Vinyl Coated Fabric


I'm really excited about the latest delivery of wipe-clean vinyl coated fabric I've had sent from the U.K. I had asked my family for the fabric as a Birthday present for me (that's my idea of a real treat!) There are some new designs and I can't wait to make up some more Craft Kit Bags and ABC Bags. I'll post photo's of the end results when they're finished, which should be very soon...

Wednesday, November 4, 2009

Reverse Garbage


We had great fun this morning rummaging around at Reverse Garbage in Marrickville. It's an enormous ware-house stuffed full of industrial discards, like empty plastic containers, wood off-cuts, cardboard, fabric samples, buttons, shiny paper, colorful shredded paper...the list goes on. It's great for cheap materials for creative projects, there's even a sculpture display showing some very interesting artwork that has been made out of 'rubbish'. I went with a friend and we spent most of the time opening up dusty boxes and peering inside. We both bought some gorgeous hessian coffee bean sacks ($1.50) for sack racing at children's parties. It's definitely an eclectic mix of new and old, good and not so good, but it's well worth a visit if you are in need of some inspiration and if (like us) you have a good sense of humour you'll have fun thinking up possible uses for some of the more unusual items!

Wednesday, October 21, 2009

Glorious Glitter


I'm always intrigued by the unexpected things that engage a child's attention particularly when it comes to gifts. Time and time again it seems to be the simple things that amuse them most. Recently my daughter had her Birthday and she received the usual pile of amazing goodies, in amongst them were two small pots of glitter, one gold and one red. These two unassuming pots have kept both children amused on countless occasions already. They've decorated bits of paper, sprinkled tissue (and my table), made fabric dolly bedding sparkle, adorned Birthday cards, posters and even a cardboard treasure chest topped with shiny colourful jewels. Who would have thought that two small pots could bring such a BIG variety of entertainment into the home!

Tuesday, October 20, 2009

Bag & book coincidence!


I had already made this Craft Kit Bag up as a Birthday present when I saw this book in our toy shop with the title 'Made by Me' and I couldn't believe the similarity. They look like they were made for each other, it was obviously meant to be!

Monday, October 19, 2009

Little gifts in a big box...


Recently I've been collecting small things to put in boxes or brightly coloured tins and give as gifts. The last one I did was a 'beauty box' for my daughters Birthday and she loved it. It looks really attractive and doubles up as a practical storage solution too.

Friday, October 16, 2009

Robin Hood's Quiver & Arrows


I've been pestered all afternoon to make a 'thing that holds arrows please Mummy' and finally caved in!

For the quiver: A cardboard tube made the perfect quiver. Punch two holes at either end of the empty tube (on the sides) with a pencil, tie a length of string through the holes to form a strap. Tape a small round of card at one end to stop arrows falling out.

For the arrows: Make arrows from straws (mine were bendy but still worked). Stick small triangles of card to one end of the straw to make the arrow heads. Keep your fingers crossed that you're not asked to make the bow too!

Thursday, October 15, 2009

What to do with old wrapping paper?


Save old birthday cards and wrapping paper, cut into small postage stamp size squares whilst having a well earned tea break, then store in a shoe box and pop in the craft cupboard. Children love to rummage through the colourful squares and shapes. With glue stick they can make mosaic style pictures and cards or decorate plain wrapping paper, even the scruffiest creation looks great when finished.

Thursday, October 1, 2009

Rainbow Ice Block!

My children and their friends love colourful homemade ice blocks. They couldn't be easier to make, just start your ice block by pouring a very small amount of juice in the mould and freezing it for a couple of hours, then top up with another juice. Have as many layers as you like, however you will be limited by the ice block stick length. Remember you have to allow for the stick to be placed back in the mould above the last frozen layer - if this bit doesn't make sense it will become absolutely crystal clear when you are in the middle of making them! Experiment with one ice block rather than six before you get creative. I usually stop at two layers but have been known to do three on days when I'm stuck in the kitchen for hours doing various tasks and brushing past the freezer. Choose fresh juices that contrast in colour and you'll get a really pleasing ice block that's nearly as exciting as one from the shops...shock horror!

Little tip: when you're ready to serve run the mould under hot water to loosen rather than pulling with brute strength as they have a tendency to 'break' if pulled too hard. This way you'll avoid being left with some very sad little expectant faces!

You will need:
Any ice block mould
At least two fresh juices in bright contrasting colours. I regularly use fresh apple juice and cranberry juice. Surprisingly children that wouldn't normally drink cranberry juice are quite happy to have it in an ice block frozen.

Wednesday, September 23, 2009

Beautiful Dolmades!


I have been making the Greek dish Dolmades for a couple of years now and every time I make them I ponder over the 'art' of wrapping the spicy rice and lamb in a vine leaf. There is definitely a knack to it, like wrapping small gifts. I find it extremely relaxing once I get into it and they taste really good too. I use a recipe from a memoir called 'Apricots on the Nile' by Colette Roassant that uses raw rice and I find it works every time. It's one of those creative dishes that is well worth the effort!

Let Yourself Sew


Gorgeous, gorgeous, gorgeous! I found this sewing magazine aimed at teenagers for $1 in Vinnies. It doesn't get any better than this for me...utter bliss!

Monday, September 21, 2009

Designer T-Shirt Party


Suitable for boys & girls, ages: 4,5,6,7,8 years

Sewing Level: Adult Beginner. Please note this project does not involve sewing for the children!

Craft Party Preparation: Trip to the shops for t-shirts or singlets and labels, 1 hour cutting and sticking, 30mins for 'test' run, 10 mins label preparation, 10mins applique for each t-shirt/singlet after the party.

It's that party time of year again! This year my daughter decided for her 7th Birthday she would like a Pancakes & Craft party just for girls. I was secretly pleased because for a while now I've been longing to use an image out of one of my childhood favourite Lady Bird books, The Runaway Pancake. In the past I've photo copied pages and framed the gorgeous illustrations and words to put in the children's nursery, and here was another opportunity to use an image but this time as party invites. Once the invites had been scanned and printed (with the help of Photo Shop for the text) it was time to decide on the craft activity. After many consultations we decided to decorate singlets with fabric. The idea was that the girls would pin simple pre-cut fabric shapes onto a plain singlet allowing them to create their own design. Then I would applique the singlets after the party and hand them to the girls at school. After a practice run with my daughter it was obvious that 'pinning' was a bad idea, far too fiddly for a 6 (soon to be 7) year old and actually the pre-cut shapes needed to have a small square of double sided sticky tape on the back to allow the girls to peel and stick the fabric on ready for me sew. The practice run was an invaluable 'test' and it also meant that my daughter had a singlet that she could wear for the party demonstrating how the finished garment should look - perfect!

Materials:

1.T-shirts or singlets (whichever you prefer, no need to spend a lot, look in some of the cheaper high street stores)

2. Scraps of fabric, any remnants will do, the bigger the variety the more fun the designs will be.

3. Bondaweb

4. Double sided sticky tape (no project would be complete without it!)

5. Sewing machine

6. White cotton thread

7. Scissors

Party Preparation: Iron Bondaweb to the back of your fabric scraps. Cut out very basic shapes like squares, triangles or oblongs. A word of warning, if you have shapes like hearts and circles they are extremely fiddly to applique afterwards and you will regret it! Having appliqued hundreds of shapes onto things over the years I felt confident about using heart shapes, however I still limited the girls to two heart shapes each for their designs. Once you've cut out about 6 shapes per child, remove the Bondaweb backing paper and stick on a very small square of double sided sticky tape. Now you have your shapes ready to stick on. Attach a blank label to each t-shirt using ribbon or string ready for the children to write their name on (if they are at the writing stage)

At the party: Adult to child ratio is really age dependant. For 6,7 and 8 yrs it's 1 adult to 5 children max. Otherwise it's maximum 1 adult to 4 children (if you're feeling brave). Prepare enough tables and chairs to seat the children. Place a cupful of pens in the centre of the table, one for each child so they can write their name on the label. Have the t-shirts and pre-cut shapes ready close by for the activity. Start the activity by demonstrating how to write their name on the label, then emphasis that they should carefully choose the pre-cut shapes and experiment with the design layout they want on the t-shirt. Suggest possible layouts to give them some ideas. Explain that once they are happy with their designs, only then do they remove the backing from the double sided sticky tape and stick into place. Explain that the fabric shapes will be sewn after the party and that they will get them back in a couple of days. Start activity. When finished pile one t-shirt on top of the other and put in safe place.

After the party:
De-stress and have a cup of tea! The next day iron on the designs with hot steamy iron. Using the satin stitch option on your sewing machine applique each fabric patch to the t-shirt. Clip loose threads inside and out. Pop finished singlet into a small paper bag, I found some gorgeous brightly coloured bags in a local craft shop. Write a thank you label and get party girl or boy to sign (my daughter did hers at the breakfast table before school) stick label to bag, give to child!

Special notes: This activity does not take the children long to do, but works really well and replaces the need for fancy party bags to take home because the t-shirt/singlet is 'the gift'. I stuck a signed 'thank you for my present' label on the bag when I delivered the singlets to my daughters friends in the school play ground a couple of days later and they were all absolutely delighted.