Workshop

Workshop

Wednesday, October 21, 2009

Glorious Glitter


I'm always intrigued by the unexpected things that engage a child's attention particularly when it comes to gifts. Time and time again it seems to be the simple things that amuse them most. Recently my daughter had her Birthday and she received the usual pile of amazing goodies, in amongst them were two small pots of glitter, one gold and one red. These two unassuming pots have kept both children amused on countless occasions already. They've decorated bits of paper, sprinkled tissue (and my table), made fabric dolly bedding sparkle, adorned Birthday cards, posters and even a cardboard treasure chest topped with shiny colourful jewels. Who would have thought that two small pots could bring such a BIG variety of entertainment into the home!

Tuesday, October 20, 2009

Bag & book coincidence!


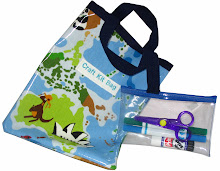
I had already made this Craft Kit Bag up as a Birthday present when I saw this book in our toy shop with the title 'Made by Me' and I couldn't believe the similarity. They look like they were made for each other, it was obviously meant to be!

Monday, October 19, 2009

Little gifts in a big box...


Recently I've been collecting small things to put in boxes or brightly coloured tins and give as gifts. The last one I did was a 'beauty box' for my daughters Birthday and she loved it. It looks really attractive and doubles up as a practical storage solution too.

Friday, October 16, 2009

Robin Hood's Quiver & Arrows


I've been pestered all afternoon to make a 'thing that holds arrows please Mummy' and finally caved in!

For the quiver: A cardboard tube made the perfect quiver. Punch two holes at either end of the empty tube (on the sides) with a pencil, tie a length of string through the holes to form a strap. Tape a small round of card at one end to stop arrows falling out.

For the arrows: Make arrows from straws (mine were bendy but still worked). Stick small triangles of card to one end of the straw to make the arrow heads. Keep your fingers crossed that you're not asked to make the bow too!

Thursday, October 15, 2009

What to do with old wrapping paper?


Save old birthday cards and wrapping paper, cut into small postage stamp size squares whilst having a well earned tea break, then store in a shoe box and pop in the craft cupboard. Children love to rummage through the colourful squares and shapes. With glue stick they can make mosaic style pictures and cards or decorate plain wrapping paper, even the scruffiest creation looks great when finished.

Thursday, October 1, 2009

Rainbow Ice Block!

My children and their friends love colourful homemade ice blocks. They couldn't be easier to make, just start your ice block by pouring a very small amount of juice in the mould and freezing it for a couple of hours, then top up with another juice. Have as many layers as you like, however you will be limited by the ice block stick length. Remember you have to allow for the stick to be placed back in the mould above the last frozen layer - if this bit doesn't make sense it will become absolutely crystal clear when you are in the middle of making them! Experiment with one ice block rather than six before you get creative. I usually stop at two layers but have been known to do three on days when I'm stuck in the kitchen for hours doing various tasks and brushing past the freezer. Choose fresh juices that contrast in colour and you'll get a really pleasing ice block that's nearly as exciting as one from the shops...shock horror!

Little tip: when you're ready to serve run the mould under hot water to loosen rather than pulling with brute strength as they have a tendency to 'break' if pulled too hard. This way you'll avoid being left with some very sad little expectant faces!

You will need:
Any ice block mould
At least two fresh juices in bright contrasting colours. I regularly use fresh apple juice and cranberry juice. Surprisingly children that wouldn't normally drink cranberry juice are quite happy to have it in an ice block frozen.